Now that HTC finally released the kernel source for the Sprint Hero,
many developers are now in a race to build custom kernels. With these
instructions, you can also build your own kernel.
This guide is a very good guide, so I'm using it as the basis for my
instructions. The instructions are going to look very similar to each
other.
In order to do these instructions, you must be running Linux. Because
you are compiling a Linux kernel, using a Linux platform makes life
much easier.
Note:
Perform a Nandroid backup on your current phone before
proceeding. If the kernel does not boot, the only way to recover
is through a Nandroid restore.
1. We need to log into Linux as root. If you have one of those
distributions that won't let you have direct root access (i.e. Ubuntu),
we'll have a way you can get root in just a moment. In the meantime,
log in as yourself.
2. Open a terminal window (there are several terminal programs you can use...I leave that up to you)
3. If you were not able to log into root, type the following command and press Enter: sudo su
If that command doesn't work, type typing the following and press Enter: su
In either case, enter the root password (or your password if you are
using Ubuntu) and press Enter. Your prompt should change from
displaying a dollar sign ($) to a pound sign (#).
4. We need to create a directory to store the source code
in. In the terminal window, type the following commands and press
Enter after each one: cd /root
mkdir heroc
cd heroc
5. Download the following file and place it in your /root/heroc directory: buildscripts.zip
6. To unzip the file you just download, type the following command and press Enter:
unzip buildscripts.zip
7. Now we have to tell Linux that we want to make the files we just
extracted executable. To do that, we type the following command and
press Enter:
chmod a+x *
8. Getting the environment created correctly is
important. If you are running Ubuntu, type the following command
and press Enter to get the Android SDK:
./createAndroidRepo.sh
For those of you that are not using Ubuntu (or want to do this
manually), the first thing you need to do is to install Sun Java 5. To
get a copy of it and install it, get a copy from http://java.sun.com/javase/downloads/5u22/jre
Also, you'll need to download additional files using your distribution repository
If you use apt, type the following line as one long command, then press Enter: apt-get install git-core gnupg flex
bison gperf libsdl-dev libesd0-dev libwxgtk2.6-dev build-essential zip
curl libncurses5-dev zlib1g-dev valgrind
If you use yum, type the following line as one long command, then press Enter: yum install git-core gnupg flex bison
gperf libsdl-dev libesd0-dev libwxgtk2.6-dev built-essential zip curl
libncurses5-dev zlib1g-dev valgrind
Now, we need to get the Android SDK. To do that, type the following and press Enter after each command: cd /root
rm -rf myandroid
mkdir myandroid
mkdir bin
curl http://android.git.kernel.org/repo > /root/bin/repo
chmod a+x /root/bin/repo
cd /root/myandroid
/root/bin/repo init -u git:..android.git.kernel.org/platform/manifest.git
/root/bin/repo sync
gpg --import < /root/heroc/android.gpg
9. If you want to run a script to get the Hero source, type the following commands, pressing Enter after each command: cd /root/heroc
./get-CDMAHero-source.sh
If you wish to do the commands manually, type the following command, pressing Enter after each command (Note: The line marked in red needs to be typed as one long command): cd /root/heroc wget http://member.america.htc.com/download/RomCode/Source_and_Binaries/heroc_ef05d31a.tar.bz2
tar xvjf heroc_ef05d31a.tar.bz2
10. Now, we need to get the config file from your phone.
You need to plug your phone into your computer. Make sure that
USB debugging is on:
a. On your phone, press the Menu button on the homescreen and press Settings
b. Press Applications
c. Press Development
d. Press USB Debugging until the checkbox to the right has a green checkmark in it.
Now, type the following commands, pressing Enter after each command: adb pull /proc/config.gz /root/heroc/config.gz
gunzip config.gz
11. Now that you have the configuration file, it is time to run
the menuconfig to configure your kernel. Type the following
commands, pressing Enter after each command: export ARCH=arm
export CROSS_COMPILE=arm-eabi-
export PATH=$PATH:/root/myandroid/prebuilt/linux-x86/toolchain/arm-eabi-4.4.0/bin
cd /root/heroc/heroc_ef05d31a
make menuconfig
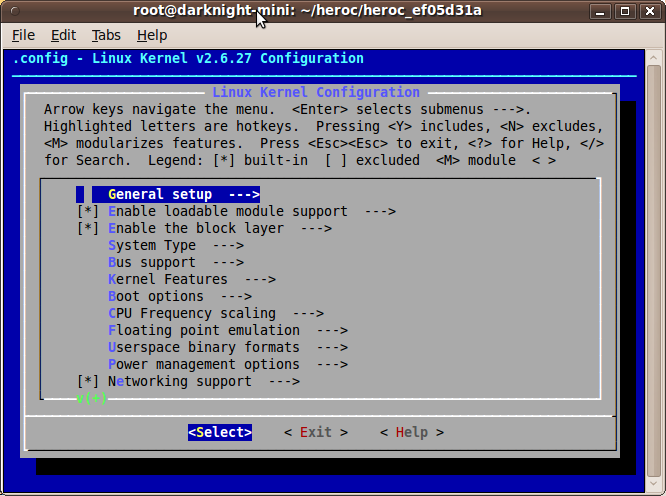
12. So far, so good. If all works well, you should see the following screen:
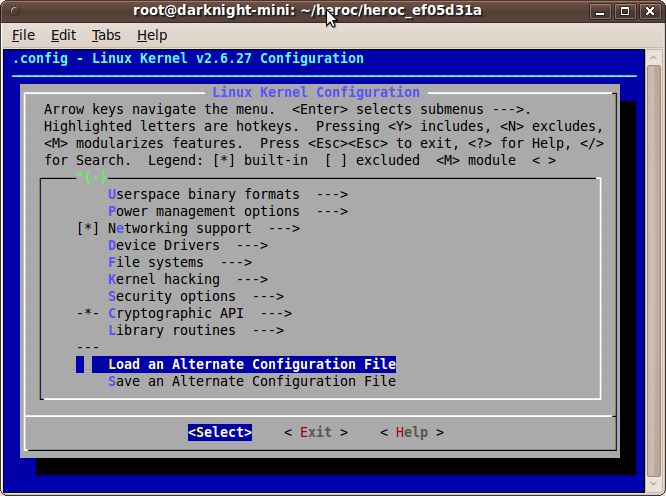
Now, what we need to do is to load the configuration from the
phone. Scroll down the list in the Linux Kernel Configuration
screen until you see the an entry called "Load an Alternate
Configuration File". It should look something like this:
Press Enter. When prompted for a configuration filename, type /root/heroc/config and press Enter. You will return to the Linux Kernel Configuration screen.
Here's where the fun begins. Each one of these entries is an
option to configure the kernel. These options leads to more
options. Eventually, you'll end up on a configuration item.
If you want a particular option added to the kernel itself, press Y. If you want to exclude an item from the kernel (or you change your mind about adding an item), press N. If you think you may need an item in the future, but you don't want it as part of the kernel, press M
to have the kernel load a kernel module instead (if you don't have a
kernel module or don't know how to build one, that's okay...the kernel
will still load even if a module is missing).
A word of
advice...any items that are already selected...please leave
alone. Your kernel could fail to load or your phone malfunction
if you change any of the already preset items. If you do change them, remember that you are changing factory items at your own risk.
13. Once you are finished setting up your kernel, select "Save an
Alternate Configuration File" located on the first menu page (just
below "Load an Alternate Configuration File"). Press Enter to
select.
When prompted, type /root/heroc/heroc_ef05d31a/.config and press Enter. When you are back on the Linux Kernel Configuration screen, select Exit.
14. Now it is time to compile your kernel and the Wifi module
(you'll need to do this module for Wireless Internet access). In
the terminal window, type the following (press Enter after each
command): make
export KERNEL_DIR=/root/heroc/heroc_ef05d31a/
cd /root/myandroid/system/wlan/ti/sta_dk_4_0_4_32/
make
cp /root/heroc/heroc_ef05d31a/arch/arm/boot/zImage /root/heroc/zImage
I should tell you that it will take a while to perform the first compile (first make command). If the command errors out (which sometimes it does), make a note on what the compiler was doing. Type make menuconfig
again and either take out the offending item or make it load as a
module. Save the configuration again (see Step 13) and run this
step again.
15. Not bad so far. You've passed the roughest part:
compiling a kernel. Now we have to install it on the phone.
First, we need to get the boot image from the phone. Type the
following commands in the Terminal window and press Enter after each
cmmand: adb shell
cat /dev/mtd/mtd2 > /sdcard/mtd2.img
exit
adb pull /sdcard/mtd2.img /root/heroc/mtd2.img
cd /root/heroc
mv mtd2.img boot.img
16. Now we have the image from the phone, we're going to create a
new boot image. Type the following commands, pressing Enter after
each one (Note: The line marked in red needs to be typed as one long command):
./extract-kernel.pl boot.img
./extract-ramdisk.pl boot.img
rm boot.img-kernel
cp zImage boot.img-kernel
./mkbootfs boot.img-ramdisk | gzip > ramdisk-boot ./mkbootimg
--kernel boot.img-kernel --ramdisk ramdisk-boot --cmdline
"no_console_suspend=1 console=null" -o newBoot.img --base 0x19200000
17. We've now created a new boot image...let's see if it works on
the phone. Type the following commands, pressing Enter after each
one: adb push newBoot.img /sdcard/newBoot.img
adb shell
cat /dev/zero > /dev/mtd/mtd2
flash_image boot /sdcard/newBoot.img
exit
18. Now we have to push the Wifi drivers. Type the following commands and press Enter after each one: adb push /root/myandroid/system/wlan/ti/sta_dk_4_0_4_32/wlan.ko /sdcard/wlan.ko
adb shell
mount -o remount,rw -t yaffs2 /dev/block/mtdblock3 /system
cp /sdcard/wlan.ko /system/lib/modules/wlan.ko
reboot
Your phone should be rebooting. If all
goes well, you should see your phone boot back into the Sense UI
system. If not, just run a Nandroid restore and try again.